WeChat Miniprogram
::tip hint
This document is in front of Miniprogram Developer, in the description that follows, we assume you already have development experience of front end, micromessenger applet, etc. and have installed related micromessenger app.
:::
Environmental requirements
Terminal Requirements
- IOS Wechat App Version Requirements:7.0.9.
- Android Wechat App minimum request:7.0.8.
- The micromessage PC applet (windows/macOS) app.
- Minimum version requirement for the base library:2.10.0.
View Function Limit Requirement (no access for negligible)
If you use a watched capability, make sure all of the following requirements are met when developing tests :
Onlymicromessaging applets are supported
Since the applet test number is not numerous with
<live-pusher>and<live-player>, you need to apply for the regular applet account for development.Since native components (i.e.
<live-pusher>and<live-player>tags) need to run onTrueare not supported by the developer tool.The applet pull label does not support individual applets but only business class app.
The applet pull usage permission is temporarily open to limitedclasses.
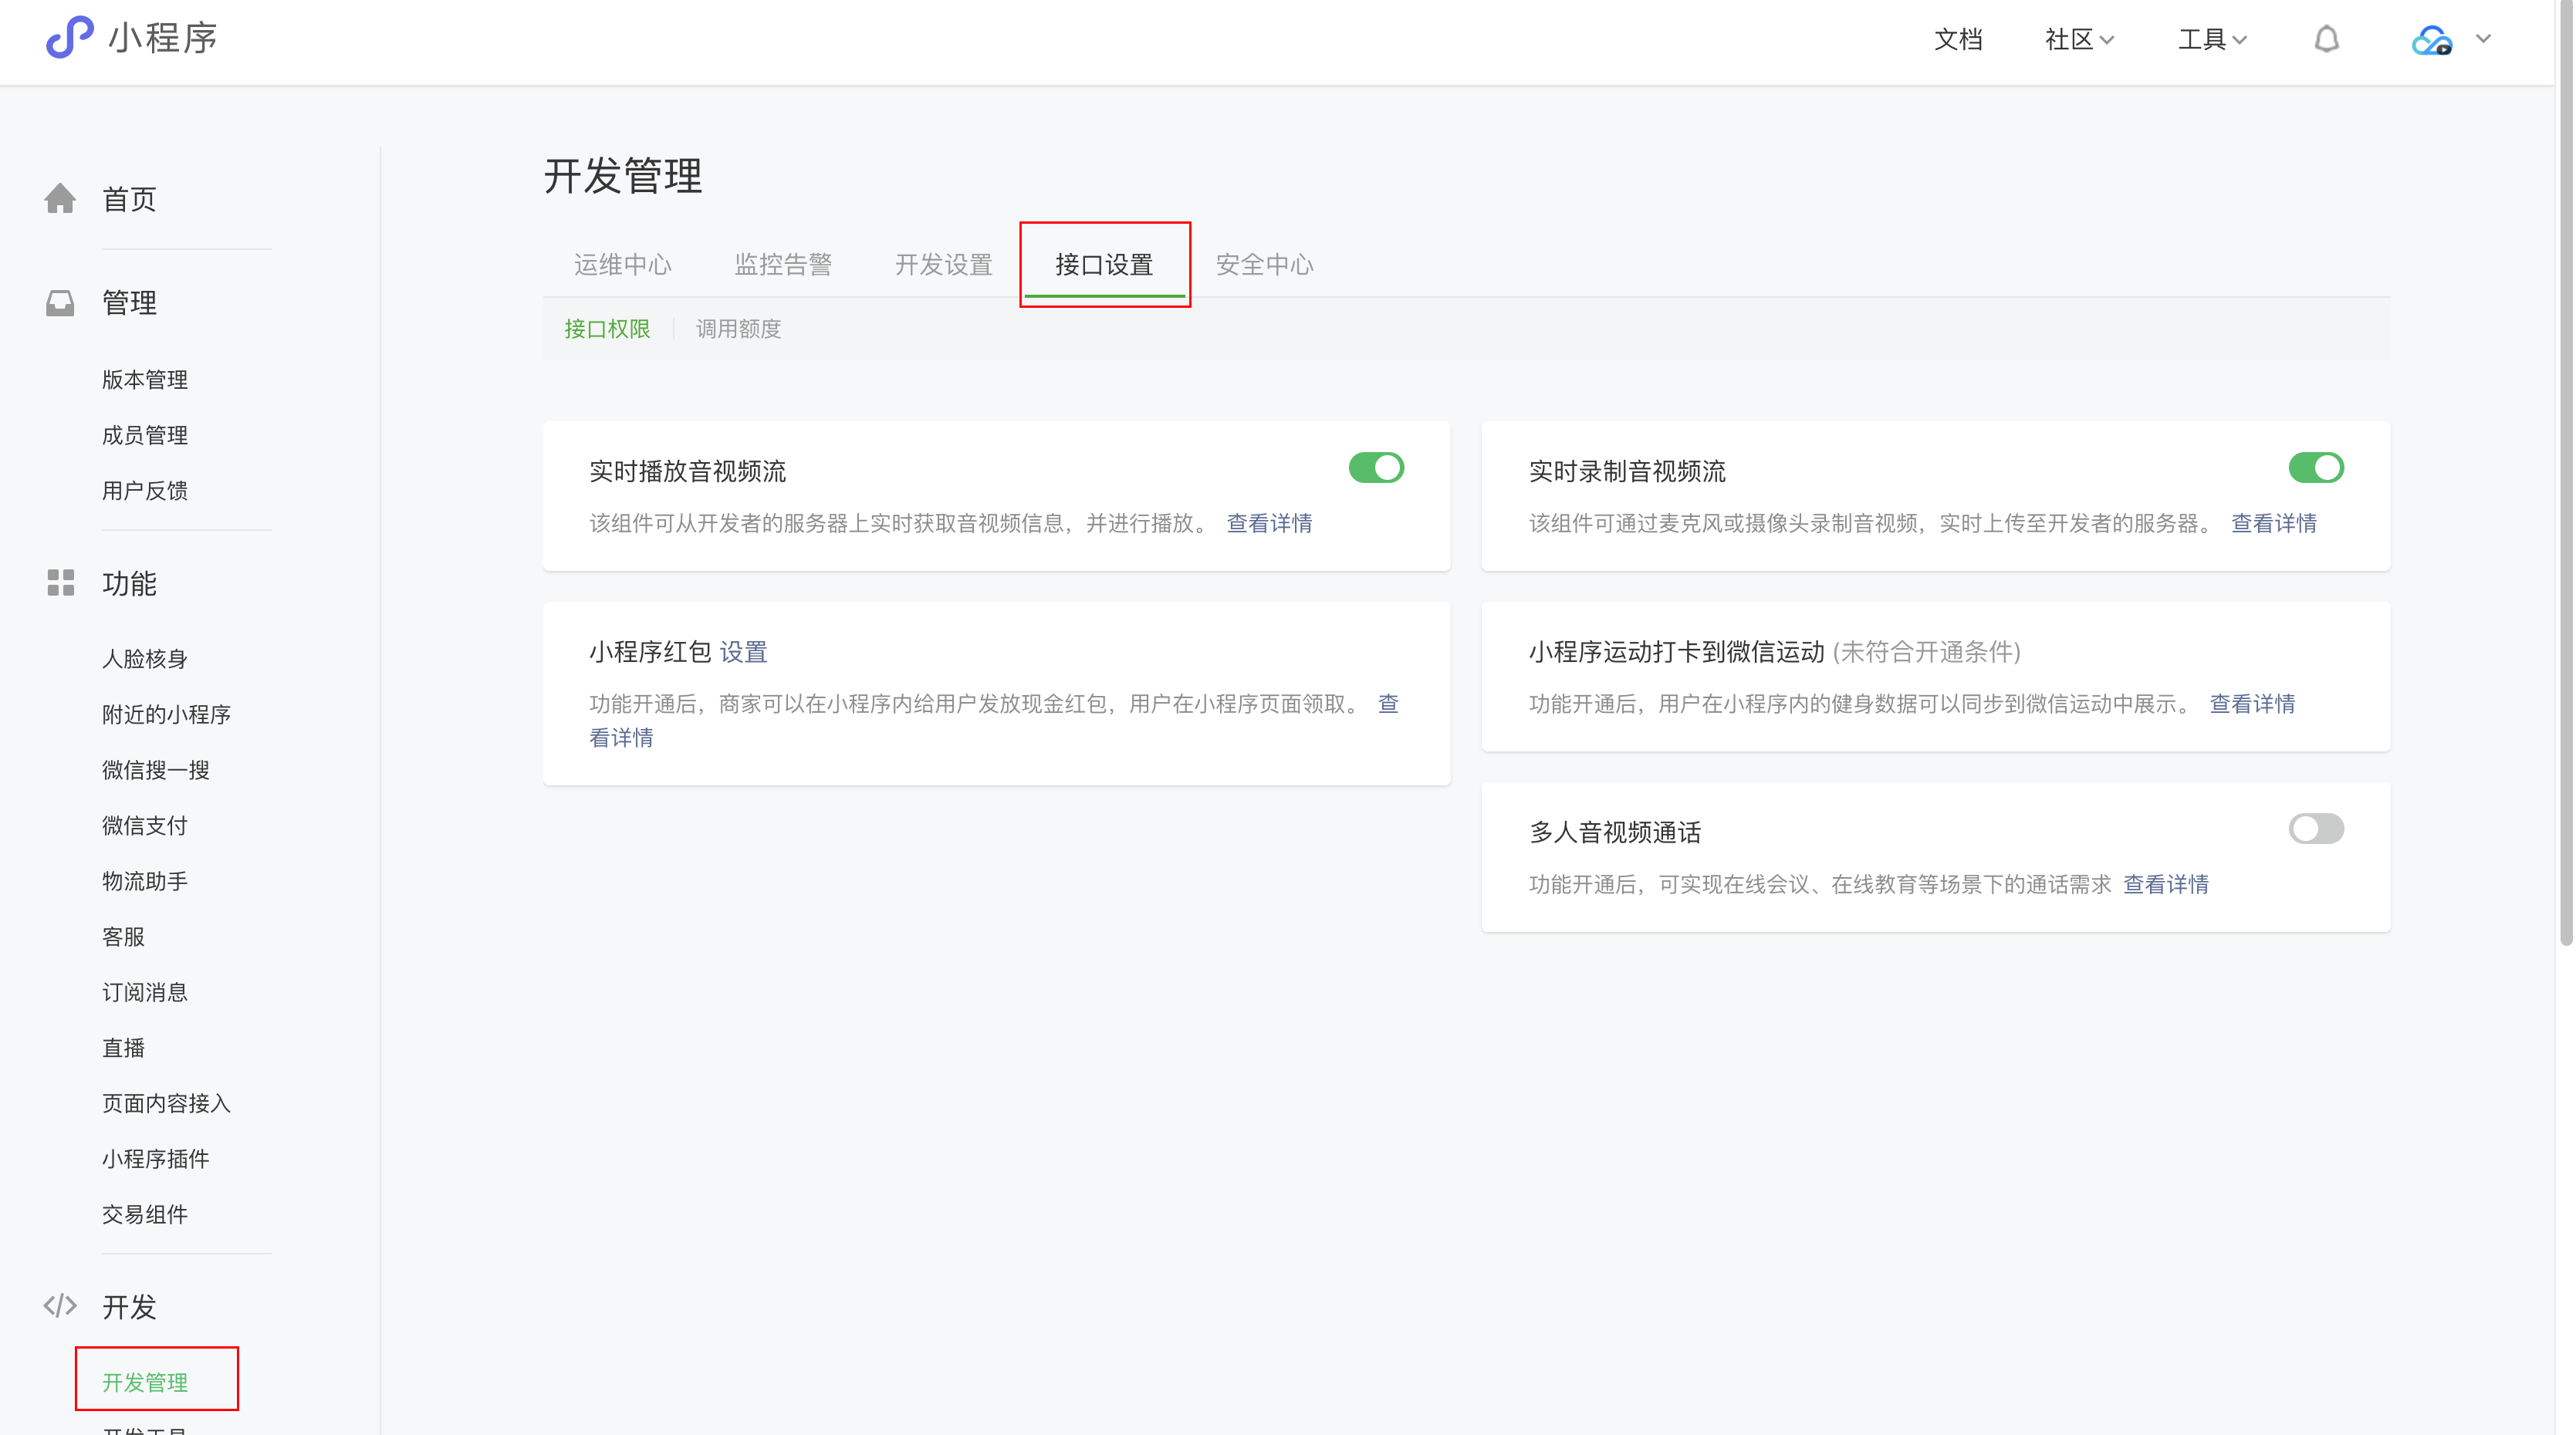
Small programs that meet the category requirements need to be activated in [WeChat Public Platform]>[Development]>[Development Management]>[Interface Settings],real-time playback of audio and video streamsandreal-time Two permissions for recording audio and video streams, as shown in the figure below:
Development preparation
Apply SDK access key
Please apply to the developer center for access key containing app_id and app_secret.
Add widget's valid domain whitelist
Requisite valid domain name:
https://cloud.tencent.com;https://yun.tim.qq.com;https://app-gateway-realsee.ke.com;https://app-gateway.realsee.com;https://app-gateway.rushivr.com;.Legal domain name for WebSocket:
wss://ws.realsee.cn;wss://ws.realsee.com;wss://ws.rushivr.cn;wss://ws.rushivr.com;.
SDK Downloads
Download vrwebview-miniprogram.zip file through SDK resource , decompress it and use it in subsequent development.
SDK Usage
vrwebview-miniprogram provides capability access in the form of native custom components of the micromessaging app. In theory only the custom component development framework that supports the micromessenger applet can be developed and has now been tested for the inbound framework:
The following code variables are used in method$PROJECTidentify the root of the development framework.
Miniprogram native development usage
- Unpressed
vrwebview-miniprogram.zipto$PROJECT/lib/vrwebviewdirectories are structured around:
-$PROJECT
  -pages
    -vr
      -index.js
      -index.json
      -index.wxml
      -index.wxss
  -lib
    -vrwebview
      -index.d.ts
      -index.js
      -index.json
      -index.wxml
      -utils.d.ts
      -utils.js
      -trtc-wx.js
      -TERMS.txt
- Assume that the page directory you want to introduce components is
$PROJECT/pages/vr, the configuration json file in the page directory needs to be modified.The following is:
{
  "usingComponents": {
    "vr-webview": "$PROJECT/lib/vrwebview"
  }
}
- Add component nodes to the template wxml file in the page directory.The following is:
<vr-webview
  wx:if="{{rsVrUrl}}"
  rsVrUrl="{{rsVrUrl}}"
  rsVrOptions="{{rsVrOptions}}"
  rsVrSchemes="{{rsVrSchemes}}"
  rsVrBehaviors="{{rsVrBehaviors}}"
>
</vr-webview>
- Initialize SDK on page js.Example after:
const { rsVrWebviewPropsWrapper } = require("$PROJECT/lib/vrwebview/utils");
Page({
  data: {
    rsVrUrl: "",
    rsVrOptions: "",
    rsVrSchemes: "",
    rsVrBehaviors: "",
  },
  onReady() {
    this.initVr();
  },
  initVr() {
    const rsVrUrl = "vr链接";
    const rsVrOptions = rsVrWebviewPropsWrapper({
      app: {
        key: "app_id",
        secret: "app_secret",
        gateway: "网关地址",
        startup: "sdk启动uri",
        sign: "语音签名uri",
      },
      info: {
        appName: "小程序名",
        appVersion: "小程序版本",
        scheme: "jsbridge调用的协议头",
        userAgent: "特殊UA",
        extraData: {}, // 其它自定义扩展信息
      },
      trtc: require("$PROJECT/lib/vrwebview/trtc-wx"), // 可选项,需要带看的时候必填
    });

    // 注⼊⾃定义scheme,这⾥是与h5约定的使⽤jsbridge-x进⾏通信的⽅法
    const rsVrSchemes = rsVrWebviewPropsWrapper({
      customFunction: (callback, params) => {
        // ⾃定义⽅法,h5会通过jsbridge-x的 callAndBackfeed 或 callAndListen 的⽅式进⾏调⽤(具体调⽤⽅式由两者协商确定)
        // callAndBackfeed 是⼀次订阅流,可当⼀次函数调⽤,将结构通过callback回调给h5
        // callAndListen 是多次订阅流,与事件订阅类似,把callback注册到某事件的回调⾥,并且在⻚⾯关闭后解除注册
        // 例如:wx.onError(callback) // 持续向h5上报wx的报错
        // 解除:wx.offError(callback)
      },
    });

    // 注⼊VRWebview组件所需的⾏为
    const rsVrBehaviors = rsVrWebviewPropsWrapper({
      // 进⾏登录
      requestLogin: async () => {
        // 需返回的数据结构
        return {
          userName: "⽤户名",
          userId: "⽤户ID",
          token: "⽤户令牌",
          avatar: "⽤户头像",
        };
      },
      // 获取⽤户信息
      getUserInfo: async () => {
        // 需返回的数据结构
        return {
          userName: "⽤户名",
          userId: "⽤户ID",
          token: "⽤户令牌",
          avatar: "⽤户头像",
        };
      },
      // 进⾏分享
      actionShare: async (params) => {
        // h5中会有分享功能,params是相应的分享配置(由h5与⼩程序之间进⾏协商)
        // 因为⼩程序在webview下⽆法直接调起分享,这⾥的最佳实践是获取params的数据后对⻚⾯的shareConfig数据进⾏缓存,在分享相关的钩⼦函数⾥将缓存的数据返给wx
      },
      // 当VR退出时, _params是与h5协商的退出消息结构
      onExitVr: async (_params) => {
        console.log("onExitVr", _params);
      },
      // 当webview发⽣错误时进⾏处理
      onWebViewError: (e) => {
        console.error("onWebViewError", e);
      },
      // 组件报错时的回调
      onError: (e) => {
        console.error("onError", e);
      },
      // 获取⽤户的token,因为h5使⽤token时可能会因token超时失效,该⽅法要求返回最新的有效token
      getToken: async () => {
        // return 'abc'
      },
    });

    // 把声明好的变量塞给组件
    this.setData({
      rsVrUrl,
      rsVrOptions,
      rsVrSchemes,
      rsVrBehaviors,
    });
  },
});
Taro 3 Framework Access
- Unpacking
vrwebview-miniprogram.zipto$PROJECT/wxcomponents/vrwebviewdirectories around:
-$PROJECT
  -src
    -pages
      -vr
        -index.tsx
        -index.config.js
    -lib
      -vrwebview
        -index.d.ts
        -index.js
        -index.json
        -index.wxml
        -utils.d.ts
        -utils.js
        -trtc-wx.js
        -TERMS.txt
- Assume that the page directory path you want to introduce to the component is
$PROJECT/src/pages/vrthen change the configuration in the page directory.The following is:
export default {
  usingComponents: {
    // Define the third-party components that need to be imported
    // 1. The key value specifies the name of the third-party component, starting with a lowercase
    // 2. The value value specifies the relative path of the js file of the third-party component
    "vr-webview": "../../wxcomponents/vrwebview/index",
  },
};
- Using components on page
index.tsxas shown below:
import React, { Component } from 'react'
import { View } from '@tarojs/components'
import { rsVrWebviewPropsWrapper } from "$PROJECT/lib/vrwebview/utils"

export default class Index extends Component {
  this.state = {
    rsVrUrl: "",
    rsVrOptions: "",
    rsVrSchemes: "",
    rsVrBehaviors: "",
  }

  onReady () {
    this.initVr()
  }

  initVr() {
        const rsVrUrl = "vr链接";
    const rsVrOptions = rsVrWebviewPropsWrapper({
      app: {
        key: "app_id",
        secret: "app_secret",
        gateway: "网关地址",
        startup: "sdk启动uri",
        sign: "语音签名uri",
      },
      info: {
        appName: "小程序名",
        appVersion: "小程序版本",
        scheme: "jsbridge调用的协议头",
        userAgent: "特殊UA",
        extraData: {}, // 其它自定义扩展信息
      },
      trtc: require("$PROJECT/lib/vrwebview/trtc-wx"), // 可选项,需要带看的时候必填
    });

    // 注⼊⾃定义scheme,这⾥是与h5约定的使⽤jsbridge-x进⾏通信的⽅法
    const rsVrSchemes = rsVrWebviewPropsWrapper({
      customFunction: (callback, params) => {
        // ⾃定义⽅法,h5会通过jsbridge-x的 callAndBackfeed 或 callAndListen 的⽅式进⾏调⽤(具体调⽤⽅式由两者协商确定)
        // callAndBackfeed 是⼀次订阅流,可当⼀次函数调⽤,将结构通过callback回调给h5
        // callAndListen 是多次订阅流,与事件订阅类似,把callback注册到某事件的回调⾥,并且在⻚⾯关闭后解除注册
        // 例如:wx.onError(callback) // 持续向h5上报wx的报错
        // 解除:wx.offError(callback)
      },
    });

    // 注⼊VRWebview组件所需的⾏为
    const rsVrBehaviors = rsVrWebviewPropsWrapper({
      // 进⾏登录
      requestLogin: async () => {
        // 需返回的数据结构
        return {
          userName: "⽤户名",
          userId: "⽤户ID",
          token: "⽤户令牌",
          avatar: "⽤户头像",
        };
      },
      // 获取⽤户信息
      getUserInfo: async () => {
        // 需返回的数据结构
        return {
          userName: "⽤户名",
          userId: "⽤户ID",
          token: "⽤户令牌",
          avatar: "⽤户头像",
        };
      },
      // 进⾏分享
      actionShare: async (params) => {
        // h5中会有分享功能,params是相应的分享配置(由h5与⼩程序之间进⾏协商)
        // 因为⼩程序在webview下⽆法直接调起分享,这⾥的最佳实践是获取params的数据后对⻚⾯的shareConfig数据进⾏缓存,在分享相关的钩⼦函数⾥将缓存的数据返给wx
      },
      // 当VR退出时, _params是与h5协商的退出消息结构
      onExitVr: async (_params) => {
        console.log("onExitVr", _params);
      },
      // 当webview发⽣错误时进⾏处理
      onWebViewError: (e) => {
        console.error("onWebViewError", e);
      },
      // 组件报错时的回调
      onError: (e) => {
        console.error("onError", e);
      },
      // 获取⽤户的token,因为h5使⽤token时可能会因token超时失效,该⽅法要求返回最新的有效token
      getToken: async () => {
        // return 'abc'
      },
    });

    // 把声明好的变量塞给组件
    this.setState({
      rsVrUrl,
      rsVrOptions,
      rsVrSchemes,
      rsVrBehaviors,
    });
  }

  render () {
    const { rsVrUrl, rsVrOptions, rsVrSchemes, rsVrBehaviors } = this.state;
    return (
      <View>
        {rsVrUrl && (
          <vr-webview
            rsVrUrl={rsVrUrl}
            rsVrOptions={rsVrOptions}
            rsVrSchemes={rsVrSchemes}
            rsVrBehaviors={rsVrBehaviors}
          ></vr-webview>
        )}
      </View>
    );
  }
}
uni-app access
- New
wxcomponentsdirectory, willvrwebview-miniprogram.zipextract to$PROJECT/wxcomponents/vrwebviewdirectories around:
-$PROJECT
  -src
    -pages
      -vr
        -index.vue
    -wxcomponents
      -vrwebview
        -index.d.ts
        -index.js
        -index.json
        -index.wxml
        -utils.d.ts
        -utils.js
        -trtc-wx.js
        -TERMS.txt
- Add a declaration to the project profile
pages.jsonfor pages that need to introduce components, eg:
{
  "pages": [
    //The first item in the pages array indicates the application startup page, refer to:https://uniapp.dcloud.io/collocation/pages
    {
      "path": "pages/index/index",
      "style": {
        "usingComponents": {
          // #ifdef APP-PLUS || MP-WEIXIN || MP-QQ
          "vr-webview": "/wxcomponents/vrwebview/index"
          // # endif
        }
      }
    }
  ]
}
- Use the following in vue page
<template>
  <vr-webview
    v-if="rsVrUrl"
    :rsVrUrl="rsVrUrl"
    :rsVrOptions="rsVrOptions"
    :rsVrSchemes="rsVrSchemes"
    :rsVrBehaviors="rsVrBehaviors"
  >
  </vr-webview>
</template>

<script>
// 当需要带看时需要自行引入TRTC
// import TRTC from '../../wxcomponents/vrwebview/trtc-wx'

// 引入组件props数据进行封装的工具函数
import { rsVrWebviewPropsWrapper } from "../../wxcomponents/vrwebview/utils.js";

export default {
  data() {
    return {
      // 组件使用的初始化参数
      rsVrUrl: "",
      rsVrOptions: "",
      rsVrSchemes: "",
      rsVrBehaviors: "",
    };
  },
  onLoad() {},
  onReady() {
    this.initVr();
  },
  methods: {
    // 进行VR的初始化,在这里对组件的参数进行处理
    initVr() {
      // 这个是VR网关相关的配置
      this.rsVrOptions = rsVrWebviewPropsWrapper({
        app: {
          key: "app_id",
          secret: "app_secret",
          gateway: "网关地址",
          startup: "sdk启动uri",
          sign: "语音签名uri",
        },
        info: {
          appName: "小程序名",
          appVersion: "小程序版本",
          scheme: "jsbridge调用的协议头",
          userAgent: "特殊UA",
          extraData: {}, // 其它自定义扩展信息
        },
        // trtc: TRTC, // 带看引入的TRTC对象
      });

      // 注入自定义scheme,这里是与h5约定的使用jsbridge-x进行通信的方法
      this.rsVrSchemes = rsVrWebviewPropsWrapper({
        customFunction: (callback, params) => {
          // 自定义方法,h5会通过jsbridge-x的 callAndBackfeed 或 callAndListen 的方式进行调用(具体调用方式由两者协商确定)
          // callAndBackfeed 是一次订阅流,可当一次函数调用,将结构通过callback回调给h5
          // callAndListen 是多次订阅流,与事件订阅类似,把callback注册到某事件的回调里,并且在页面关闭后解除注册
          // 例如:wx.onError(callback) // 持续向h5上报wx的报错
          // 解除:wx.offError(callback)
        },
      });

      // 注入VRWebview组件所需的行为
      this.rsVrBehaviors = rsVrWebviewPropsWrapper({
        // 进行登录
        requestLogin: async () => {
          // 需返回的数据结构
          return {
            userName: "用户名",
            userId: "用户ID",
            token: "用户令牌",
            avatar: "用户头像",
          };
        },
        // 获取用户信息
        getUserInfo: async () => {
          // 需返回的数据结构
          return {
            userName: "用户名",
            userId: "用户ID",
            token: "用户令牌",
            avatar: "用户头像",
          };
        },
        // 进行分享
        actionShare: async (params) => {
          // h5中会有分享功能,params是相应的分享配置(由h5与小程序之间进行协商)
          // 因为小程序在webview下无法直接调起分享,这里的最佳实践是获取params的数据后对页面的shareConfig数据进行缓存,在分享相关的钩子函数里将缓存的数据返给wx
        },
        // 当VR退出时, _params是与h5协商的退出消息结构
        onExitVr: async (_params) => {
          console.log("onExitVr", _params);
        },
        // 当webview发生错误时进行处理
        onWebViewError: (e) => {
          console.error("onWebViewError", e);
        },
        // 组件报错时的回调
        onError: (e) => {
          console.error("onError", e);
        },
        // 获取用户的token,因为h5使用token时可能会因token超时失效,该方法要求返回最新的有效token
        getToken: async () => {
          // return 'abc'
        },
      });

      // 这里是需要打开的vr链接, 注意,一定等上面初始化完成再设置vrUrl,因为vue的特性,提前设置vrUrl会导致组件提前渲染报错。
      this.rsVrUrl = ""; // Here is VRLink
    },
  },
};
</script>